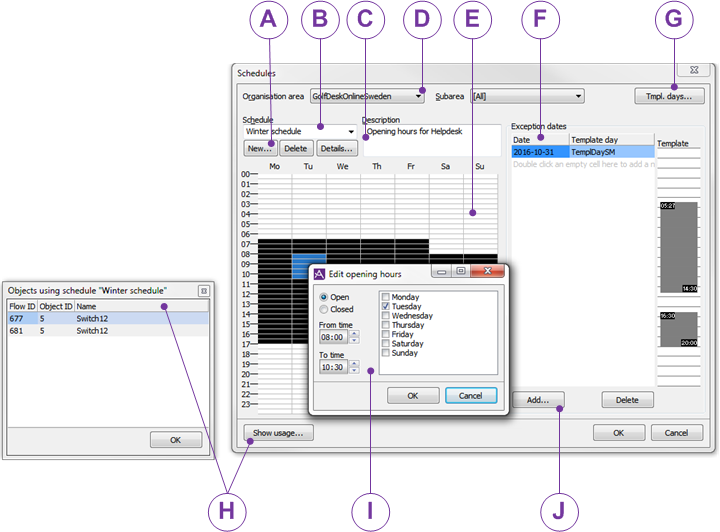
Opening hours for CallGuide IVR VCC and in CallGuide IVR Gateway are set in the Schedules window, found under the Routing | Schedules... menu.
All changes are made via the same main window, in different windows opening up depending on what you choose to define.
In the Schedules window you always start by selecting organisation area, and subarea, if any, from the drop-down lists at the top.
If it is a global schedule that shall apply to all areas in your entire CallGuide system, you select [None] in the Organisation area drop-down menu.
In the Subarea drop-down list you see the subareas in the organisation area that you have the access right to, as well as the [All] and [Without subarea] options.
If you select [All] you can see the schedules included in your selected organisation areas but also those affiliated to the selected organisation area but also affiliated to one or some subareas. [All] also presents the schedules that are not affiliated to a subarea. You select [Without subarea] if the schedule you are looking for, exists in your selected organisation area, but is not affiliated to any of its subareas. Subarea is not available if you have selected [None] as Organisation area or if there are no subareas in your selected organisation area.
To create a new schedule, you start by clicking on the New... button beneath the Schedule drop-down menu in the Schedules window.
In the opened Schedule details window, you first specify a unique name for the schedule. The organisation area, and subarea, if any, you have selected in the previous window is already entered, but you can change that. Then pick another organisation area from the drop-down menu and select a subarea by ticking it in the Available box. Then click on the arrow pointing to the right. To undo a selected subarea, you select the subarea in the Selected box and click on the arrow pointing to the left. Save with OK.
In the empty schedule created, you use your mouse pointer to select the days of the week to be included in the schedule. When you have selected the area, the Edit opening hours window will open.
You can change the opening hours in a schedule, for one day, or for several days at the time. Select a time period in the schedule you picked. In the opened Edit opening hours window you enter the required
The times and weekdays you pick in the Edit opening hours box apply - regardless of the time period you selected earlier.
First tick whether you want the selected time period to be open or closed.
Then you select start and stop time in the From time, and To time drop-down menus.
Tick (ü) the weekdays to be included in the schedule and click on OK
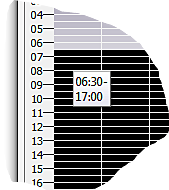
A schedule is divided into 30-minute blocks, and it could be difficult to see the exact times for opening and closing from a picture. If you move your mouse pointer over a block, a weekday in the schedule, you see the opening hours for that entire day in a help text box.
With the Details... button beneath the Schedule drop-down menu, you open the Schedule details window, where you can change the name of a schedule. The name must be unique. You can also change affiliation area for the schedule, depending on your access role, your access areas, and provided no illicit references to template days are created. In other words, you can change the affiliation area of the schedule to another organisation area, with or without subareas, or [None] if you want this schedule to be system global.
A selected schedule can be removed by your clicking on the Delete button below the Schedule drop-down menu. The selected schedule is erased and the next, or previous, schedule is seen in the Schedule drop-down menu. If the schedule is in use, if there are dialogue objects referring to this schedule, you will be informed that the schedule cannot be removed. Removing a schedule does not automatically result in template days being removed; however, references may vanish.